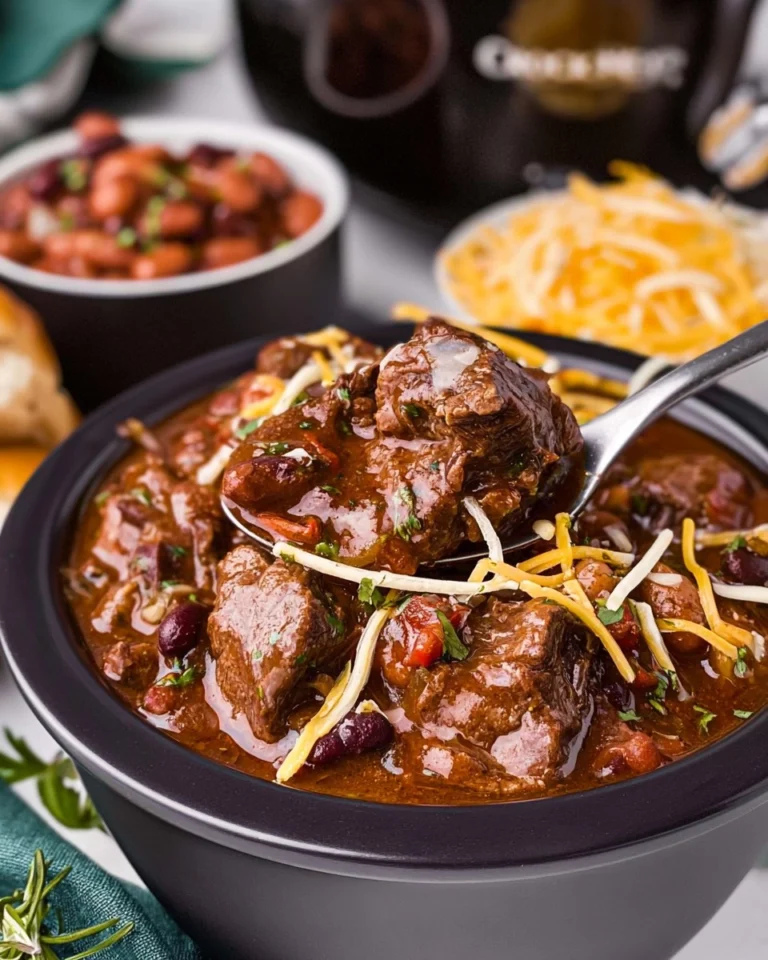
A warm bowl of chili brings comfort to any gathering or family dinner. The way its hearty texture and rich flavors meld together creates an experience that can be both nostalgic and heartwarming. Since my first taste, I’ve always appreciated chili not just for its comforting nature but also for its versatility. Plus, it’s budget-friendly, making it a go-to for weeknight meals and large gatherings alike.

One of the best parts about chili is its ability to be made ahead of time and then frozen for later enjoyment. A Simple Guide On How To Freeze Chili not only helps in meal prepping but also ensures that you have a delicious homemade meal waiting for you when time is tight. The process is straightforward, and you will savor the delightful flavors that come from your own kitchen, avoiding those store-bought alternatives that lack personal touch. So let’s dive into this simple, effective way to freeze chili for later use!
Why You’ll Love This Recipe
- Simple & Quick: You can cook up a batch of chili in just a couple of hours and freeze it for later.
- Irresistible Flavor: The combination of fire-roasted tomatoes and homemade chili seasoning creates a bold and flavorful dish.
- Flexible Serving: Perfect for cozy family dinners, game day snacks, or meal prep for busy weeks.
- Crowd-Pleaser: This hearty meal satisfies everyone, making it ideal for gatherings.
- Freezer-Friendly: Freeze portions for up to three months—ideal for busy nights!
Ingredients You’ll Need
- 1 pound thawed cooked ground beef: The foundation of your chili, giving it a hearty, meaty texture. If you’re looking for alternatives, ground turkey or a plant-based option will work well.
- 1/2 cup diced onion: Onions add sweetness and depth of flavor. You can also use green onions or shallots in a pinch.
- 2 tablespoons diced jalapeno: For a bit of heat and flavor. Customize the spice level by adjusting the amount or using a milder pepper.
- 28 oz can crushed fire-roasted tomatoes: These provide a smoky flavor and rich base for your chili. Regular crushed tomatoes can be used if fire-roasted aren’t available.
- 14 oz can diced fire-roasted tomatoes: Adds texture and additional flavor. Again, you can substitute with diced regular tomatoes if needed.
- 1 cup chicken broth: Enhances the chili’s richness. Vegetable broth is a great vegetarian option here.
- 2 tablespoons homemade chili seasoning: This is the secret to a delicious chili; you can easily make your own with chili powder, cumin, paprika, and salt.
How to Make A Simple Guide On How To Freeze Chili
- Cook the Ground Beef: In a large skillet over medium heat, brown 1 pound of thawed cooked ground beef. Make sure to break it into small crumbles for even cooking. Drain any excess fat and let it cool slightly.
- Prepare the Vegetables: Chop 1/2 cup of onion and dice 2 tablespoons of jalapeno, removing the stems and seeds. You can customize the amount of jalapeno to suit your taste.
- Combine Ingredients: In a large pot, combine the cooked ground beef, chopped onions, diced jalapeno, 28 oz can of crushed fire-roasted tomatoes, 14 oz can of diced fire-roasted tomatoes, 1 cup of chicken broth, and 2 tablespoons of homemade chili seasoning.
- Simmer: Allow the mixture to simmer over low heat for about 30 minutes, stirring occasionally until all the flavors meld together and the chili thickens.
- Cool and Store: Once the chili has cooled to room temperature, transfer it to freezer-safe bags or airtight containers. If desired, you can portion the chili into 1 pound servings and seal them.
- Label and Freeze: Don’t forget to label your containers with the date. Freeze for up to three months—a great solution for busy weeknights!
Storing & Reheating
To enjoy your chili later, store it in the refrigerator for up to three days in airtight containers. For longer storage, place it in freezer bags after cooking, ensuring you squeeze out as much air as possible. Freeze for a maximum of three months. When you’re ready to enjoy, simply reheat in a pot over medium heat for about 15-20 minutes, stirring occasionally, until heated through. You may notice a change in texture over time, but simply adding a splash of chicken broth as you heat can help restore its rich flavor.
Chef’s Helpful Tips
- Avoid overfilling your freezer bags; leave some space to allow for expansion as the chili freezes.
- It’s best to let the chili cool completely before storing to avoid condensation, which can lead to freezer burn.
- If you love a lively chili, consider adding beans or bell peppers to the mix before freezing.
- This recipe is great for experimenting—try adding corn or different types of beans for a unique twist.
- For quick reheating, defrost the chili overnight in the refrigerator before warming.
The beauty of chili lies not just in its flavors but in how it brings people together. You can tweak this recipe to suit your tastes, perhaps by adding more heat with extra jalapeños or balancing it out with a dollop of sour cream or Greek yogurt on top.

Recipe FAQs
Can I freeze chili without meat?
Absolutely! You can easily make a delicious vegetarian chili with beans, vegetables, and spices, and freeze it just like traditional chili.
How long can I keep chili in the freezer?
When stored properly in freezer-safe containers or bags, chili can be kept in the freezer for up to three months. After that, it’s best to enjoy it fresh.
Can I add beans to my chili before freezing?
Yes, beans are a great addition! If you prefer a meatless chili, feel free to add canned or cooked beans before freezing to enhance both flavor and texture.
What’s the best way to reheat frozen chili?
For best results, allow the chili to thaw overnight in the refrigerator before reheating. Then, warm it on the stovetop over medium heat, stirring occasionally, until heated through.
Every spoonful of homemade chili reminds you that good food doesn’t have to be complicated. With this simple guide to freezing chili, you can have hearty meals ready at your fingertips, so you can focus on other things during busy days. Enjoy your cooking and the delicious warming bowls of chili that follow!
Print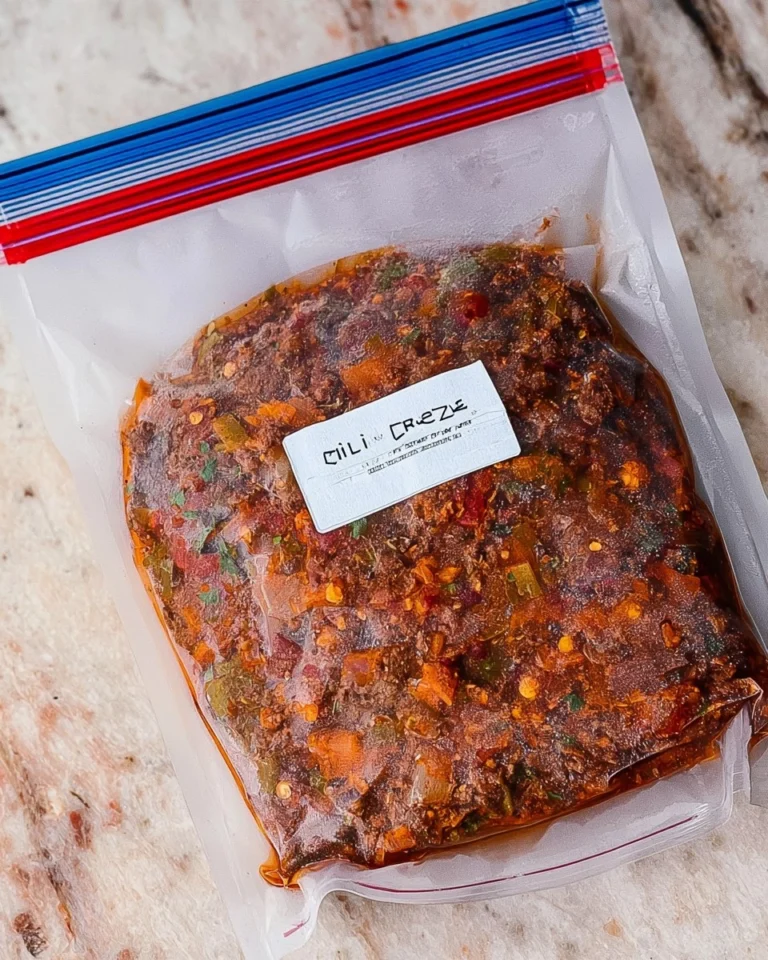
A Simple Guide On How To Freeze Chili
This Simple Guide On How To Freeze Chili delivers incredible flavor with minimal effort. Featuring tender ground beef, zesty jalapeños, and fire-roasted tomatoes, it’s the perfect solution for easy meals and comforting dishes that can be made ahead of time.
- Total Time: 50 minutes
- Yield: 6 servings 1x
Ingredients
- 1 pound thawed cooked ground beef
- 1/2 cup diced onion
- 2 tablespoons diced jalapeno
- 28 oz can crushed fire roasted tomatoes
- 14 oz can diced fire roasted tomatoes
- 1 cup chicken broth
- 2 tablespoons homemade chili seasoning
Instructions
- Brown the ground beef in a pan, then drain and let it cool.
- Divide the cooked beef into 1-pound portions and store in freezer bags.
- Chop several onions, placing 1/2 cup into each freezer bag with the ground beef.
- Remove the stems and seeds from jalapeños, dice them, and add 2 tablespoons to each bag of ground beef or store separately in freezer bags.
- Prepare a batch of homemade chili seasoning.
- Freeze bags individually, or combine with other ingredients and freeze until ready to cook. When ready, heat in a slow cooker until all ingredients are heated through and vegetables are cooked.
Notes
Ensure the ground beef is completely cooled before freezing to maintain its texture.
Label the freezer bags with the date and contents for easy organization.
You can freeze the chili seasoning separately or mixed in with other ingredients.
- Prep Time: 20 minutes
- Cook Time: 30 minutes
- Category: Soups
- Method: Freezing
- Cuisine: American
Nutrition
- Serving Size: 1 bowl
- Calories: 420
- Sugar: 6g
- Sodium: 950mg
- Fat: 24g
- Saturated Fat: 10g
- Unsaturated Fat: 9g
- Trans Fat: 0g
- Carbohydrates: 23g
- Fiber: 5g
- Protein: 30g
- Cholesterol: 80mg